7 Tips For Better Cosmetic Photography

Cosmetic photography allows you to highlight the physical features of your products and highlight them in a way that will really make your products stand out from the rest, and when done correctly, it can also give you an extra edge against your competitors.

But if you’re going to be working with cosmetic photography, then it’s important that you do everything correctly because it’s commercial photography, and you have to be wakened at every step! when doing background selection, retouching with water spray, having a sandy bottom to give the ambiance of a beach and you are doing a makeup of cosmetic kit item.. not a model! without looking unprofessional or giving off the wrong message about your brand. Here are 7 tips for better cosmetic photography.

As a photographer specializing in cosmetic photography, capturing the beauty and essence of your subject is of the utmost importance. With the rise of social media and the increasing emphasis on visual content, having high-quality images is essential for any cosmetic brand or individual looking to promote their products or services.

Cosmetic photography requires a skilled hand and an eye for detail. It is not simply a matter of snapping a picture; it involves careful attention to lighting, composition, and the subject’s features. Whether you are capturing the perfect shade of lipstick or highlighting the intricate details of a skincare product, each photo must convey the essence of the product and its unique benefits.

As a photographer, it is important to understand the needs and goals of your client. Are they looking to promote a specific product line, highlight the results of a particular treatment, or simply showcase the beauty of their brand? By understanding these goals, you can tailor your approach and create images that truly capture the essence of their vision.

One key aspect of cosmetic photography is lighting. Proper lighting can make all the difference in highlighting the subject’s features and creating a natural, flattering look. Whether you are working with natural light or artificial lighting, it is important to experiment with different setups and angles to find the perfect look.

Another essential aspect of cosmetic photography is post-processing. This is where you can really bring out the beauty of your images by adjusting color, contrast, and other settings to create a polished, professional look. This process requires a keen eye and a deep understanding of editing software such as Adobe Photoshop or Lightroom.

When it comes to promoting your cosmetic photography services, SEO optimization is crucial. By strategically incorporating your target keyword, “cosmetic photography,” throughout your website and online content, you can improve your search engine rankings and attract more potential clients. However, it is important to avoid overusing your keyword, as this can actually have a negative impact on your rankings.

In conclusion, cosmetic photography is a specialized field that requires a unique blend of technical skill and artistic vision. By understanding the needs and goals of your clients, experimenting with lighting and post-processing techniques, and optimizing your content for SEO, you can establish yourself as a top-notch cosmetic photographer and attract a steady stream of clients who appreciate your attention to detail and dedication to quality.

1) Camera settings for better results


Amazing photography can cash your commercial product. Shooting in natural light is the best option for makeup photography, but you can also use studio lights. Set your camera to shoot raw, and use a tripod to avoid blurry images. Shoot at an aperture of ƒ/8 or higher to minimize distortion and lens flare.

If you’re shooting with a DSLR, set your shutter speed to 1/125th or higher and ISO between 200-400. You should also have some white balance options on hand so that you can make adjustments if necessary.

When shooting makeup photos, focus on capturing the entire face as well as close-ups of details like eyes, lips, and skin tone. You’ll want to take a lot of different pictures while experimenting with angles, lighting, and backgrounds to ensure that you get all of your desired shots.

2) Natural lighting Cosmetic photography


Natural lighting is the most important thing to think about when doing cosmetic photography. The best time to do this type of photography is in the morning or evening since these are the times of day when sunlight is softer and more diffuse.

You should also make sure that there is no harsh backlighting from behind your subject, so keep your subject away from windows or doors. Use a reflector board for a nice even light on all sides of your subject’s face. Finally, you want to make sure that there are no shadows being cast on your subject’s face as well!

3) White background, black background


Working with a white background is preferred for cosmetic photography as it’s more neutral and doesn’t distract from the product. It’s also great for starting off makeup artists that want to photograph their work. Some makeup artists who don’t feel comfortable in front of a camera can still take good pictures by using a black background like in this example

The right equipment should also be used when taking photographs- makeup should be professionally airbrushed, lighting should be consistent and correct, and the camera settings must always be set correctly to produce good quality photos. A new camera may also need to be purchased or rented if you don’t have access to professional equipment.

4) Flatlay or not flatlay? That’s the question.


No one can dispute the power of a good photo. A beautiful photo can be the difference between having a successful campaign or not. With so many ways to take photos these days, it’s important to know what you’re doing when it comes to taking pictures. Here are some tips for better cosmetic photography:

  • Background: The background of your photo is an integral part of the overall feeling that is conveyed by your image. It should be aesthetically pleasing and inoffensive, with no elements that distract from the subject matter at hand.
  • Lighting: Dim lighting should be avoided as it will cast shadows on your subject and make them appear gloomy or sickly.

5) Editing, editing, editing!


The first tip for better cosmetic photography is about lighting. If you look at any beauty magazine or blog, they will tell you that natural light is best. It’s true! Get out of the studio and take your shots outside as much as possible to get more natural looking skin tones.

Lighting can be a difficult thing to master when we are doing cosmetic photography and there are a few ways to help achieve the perfect shot. You could use an umbrella diffuser if you’re shooting indoors, this softens the light and creates a nice even glow around your subject’s face.

Another way is using a fill flash or using a reflective surface such as a mirror to bounce in some extra illumination into dark areas like under the eyes and under the brows. Always set your flash up off-camera to avoid harsh shadows being cast on the subject’s face which can give it an unflattering appearance.

6) Have a plan


This post will cover seven tips for better cosmetic photography. These tips are good to keep in mind while working on any type of photography, but they’re especially important when doing cosmetic photography. As with any project, preparation is key! Before you snap a single picture, make sure to:
1) Gather your equipment and put it all together before you start shooting.

2) Have a plan for the shoot and know what you want to do beforehand. Cosmetic photography is different than other types of photography because we’re not just capturing one image; we need a lot of different pictures. Make sure you take enough photos so that there’s at least one shot of every product and angle that you want, then choose the best ones after.

3) Work on creating beautiful light (especially natural light). It doesn’t matter how great your makeup skills are if the lighting isn’t flattering. The best time to shoot cosmetics would be in daylight or under artificial lights with diffusers or softboxes overhead.

7) How important is the quality of pictures?


The quality of a picture is determined by many factors, but the most important factor is how well you, as the photographer and artist, know your equipment. When I shoot beauty or glamour photography my goal is to create images that display the perfection of light and form, which translates into a professional looking photograph with a deep contrast range.

To achieve this image quality we use 2 lenses: Nikon AF-S Nikkor 24mm f/1.4G ED wide-angle lens for close up details and working within tight spaces where available natural light does not exist; Nikon AF-S Nikkor 50mm f/1.4G standard lens for portraits where I typically back up my subjects to allow them more room to work with their bodies.

For more content such as Facebook marketing kindly read this blog: new page experience

If you have any interest in football then must check Football Romeo
How to Unpublish WordPress Site? 3 Amazing Methods

WordPress is one of the most popular content management systems (CMS) in the world, powering over 40% of websites on the internet. Whether you’re a blogger, business owner, or developer, WordPress makes it easy to create and manage a website. However, there may be times when you need to unpublish your WordPress site or content. This could be because you’re making changes to your website or because you’re no longer using it. Many people get confused between unpublishing content or a whole site, In this article, we’ll explain how to unpublish WordPress site or unpublish WordPress content

Unpublish WordPress content

Method # 1 – Unpublish WordPress site

Step 1:Log into your WordPress dashboard

The first step in unpublishing your WordPress site is to log in to your WordPress dashboard. This is where you’ll find all the tools and options you need to manage your site. To log in, go to your WordPress site and add “/wp-admin” to the end of the URL. For example, if your site’s URL is “www.yoursite.com“, you would go to “www.yoursite.com/wp-admin“. Enter your username and password, and click “Log in”.

Step 2: Install a maintenance mode plugin

Before you unpublish WordPress site, you may want to install a maintenance mode plugin. This will display a message to your visitors that your site is under construction or temporarily unavailable. This is a great way to prevent visitors from seeing a broken or incomplete site while you work on it. There are many maintenance mode plugins available, but some of the most popular ones are WP Maintenance Mode, Coming Soon Page & Maintenance Mode, and Under Construction Page.

Step 3: Unpublish WordPress site

Once you have installed a maintenance mode plugin (if desired), you can unpublish WordPress site. To do this, go to the “Settings” menu in your WordPress dashboard and click “Reading”. In the “Reading” settings, you’ll see an option called “Site Visibility”. Click the checkbox next to “Discourage search engines from indexing this site” and click “Save Changes”. This will tell search engines not to index your site, which effectively unpublishes it.

Step 4: Notify your users

Finally, it’s a good idea to notify your users on Facebook or any other social media profile that your WordPress site is temporarily unavailable. You can do this by creating a post or page that explains why the site is offline and when it will be back up. You can also include a contact form or email address where users can get in touch with you if they have any questions or concerns.

You can temporarily take your site offline while you make changes or decide whether to keep it live. Remember to install a maintenance mode plugin to ensure your visitors see a professional message, and notify your users about the status of your site.

Method # 2

If you’re looking to unpublish WordPress site, you might be wondering what the best way to go about it is. Fortunately, the process is relatively straightforward, and we’ve put together a quick guide to help you out.

Step 1: Log in to your WordPress Dashboard

The first step in unpublish WordPress site is to log in to your WordPress dashboard. This can typically be done by visiting yourdomain.com/wp-admin and entering your login credentials.

Step 2: Navigate to the “Settings” menu

Once you’re logged in, navigate to the “Settings” menu on the left-hand side of your screen. This will bring up a list of options, including “General,” “Writing,” “Reading,” and more.

Step 3: Click on “Reading”

Next, click on the “Reading” option. This will bring up a screen where you can change your site’s visibility settings.

Step 4: Choose “Discourage search engines from indexing this site”

To unpublish WordPress site, select the option that reads “Discourage search engines from indexing this site.” This will tell search engines not to index your site, effectively unpublishing it from the web.

Step 5: Save your changes

Once you’ve made this selection, be sure to click the “Save Changes” button at the bottom of the page. This will ensure that your new settings are saved and applied to your WordPress site.

Step 6: Check that your site is unpublished

To confirm that your site is now unpublished, you can visit it in a new browser window or tab and see if it still appears in search results. If it does not, then you have successfully unpublished your WordPress site.

By following the steps outlined above, you can ensure that your site is removed from search engines and is no longer publicly accessible.

Method # 3

If you’re planning on taking down your WordPress website temporarily, you might be wondering how to unpublish WordPress site. In this method, we’ll guide you through the steps you need to take to unpublish WordPress site without losing any of your content or data.

Before we dive in, it’s important to understand the difference between unpublishing and deleting your WordPress site. When you delete your site, you’re essentially wiping all of your content and data off the internet. Unpublish WordPress site, on the other hand, simply takes your site offline temporarily while allowing you to bring it back online later.

Now that we’ve covered the basics, let’s get into the steps you need to take to unpublish WordPress site.

Step 1

Backup Your Site Before you unpublish WordPress site, it’s essential to back up all of your content and data. This step will ensure that you don’t lose any of your valuable data, and you can restore your site later with ease.

There are several WordPress plugins available that make backing up your site a breeze. Some of the popular options include UpdraftPlus, BackupBuddy, and Jetpack.

Step 2

Put Your Site in Maintenance Mode To prevent visitors from accessing your site while it’s offline, it’s essential to put your site in maintenance mode. You can do this by installing and activating the WP Maintenance Mode plugin. This plugin will display a customizable message to visitors, letting them know that your site is temporarily offline.

Step 3

Disable Your Site’s Indexing To ensure that search engines don’t index your site while it’s offline, you need to disable your site’s indexing. You can do this by going to the Settings > Reading page in your WordPress dashboard and checking the “Discourage search engines from indexing this site” box.

Step 4

Take Your Site Offline Once you’ve completed steps 1-3, you’re ready to take your site offline. You can do this by going to the Settings > Reading page in your WordPress dashboard and selecting the “A static page” option. Next, select a blank page for both your “Homepage” and “Posts page.” This step will ensure that your site is no longer accessible to visitors.

Step 5

Bring Your Site Back Online When you’re ready to bring your site back online, you can simply reverse the steps we’ve outlined above. Restore your backup, take your site out of maintenance mode, re-enable indexing, and select your desired homepage and posts page.

In conclusion, unpublishing your WordPress site is a straightforward process that requires a few simple steps. By following the steps we’ve outlined above, you can take your site offline temporarily without losing any of your valuable data or content. Remember to back up your site before unpublishing it and put it in maintenance mode to prevent visitors from accessing it while it’s offline. With these steps, you can unpublish your WordPress site with ease.

Why do we need to unpublish our WordPress site?

There are several reasons that might need to unpublish WordPress site:

  1. Making changes: You may need to unpublish your site temporarily while you make changes or updates to your content, design, or functionality.
  2. Redesigning: If you’re completely redesigning your site, you may want to take it offline until the new design is ready to be launched.
  3. Testing: If you’re testing new features or plugins on your site, you may want to unpublish it while you work on them to avoid any issues that could affect your visitors.
  4. Rebranding: If you’re rebranding your business or website, you may need to unpublish your site while you update your branding and content to reflect the new identity.
  5. Switching hosts or domains: If you’re moving your site to a new hosting provider or changing your domain name, you may need to unpublish your site temporarily while you make the transition.

Overall, unpublishing a WordPress site can be a useful tool for site owners who need to make changes or updates to their site without disrupting the user experience.

2 Steps to New Page Experience: How to switch “Facebook Classic Page” to “New Page Experience” (2024)

If you’re an old Facebook scroller then you have noticed that evolution also touched the overall look of Facebook, am talking about the old classic pages that are rapidly converting into new page experiences. The new Facebook page experience has a refreshed layout, new features, and improved functionality. If you’re still using the classic Facebook page layout and want to switch to the new one, we’ve got you covered. In this article, we will guide you through the steps of switching to the Facebook new page experience.

Step 1 Check Page Access (on Desktop)

Check If Your Page Has Access to the New Page Experience before you switch, Facebook is rolling out the new page experience gradually, so not all pages have access to it yet. To check if your page has access, follow these steps:

  • Go to your Facebook page.
  • Click on the “Settings” tab in the top-right corner of your page.
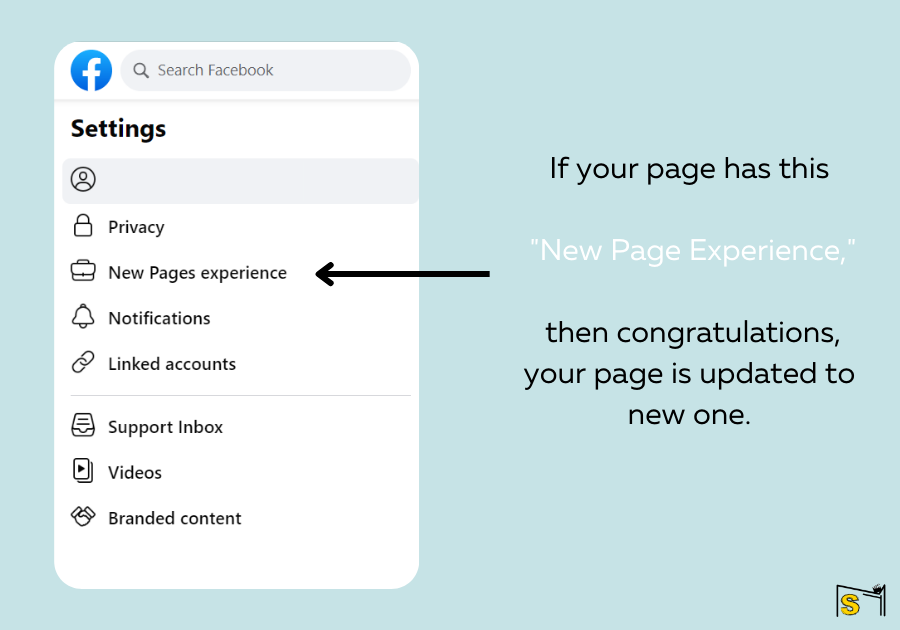
  • Look for the “New Page Experience” option in the left-hand menu.
  • If you see “Page Experience,” your page has access to the new page experience.

If your page has access, you can switch to it by following these steps:

  • Go to your Facebook page.
  • Click on the “Settings” tab in the top-right corner of your page.
  • Look for the “Page Experience” option in the left-hand menu.
  • Click on “Page Experience.”
  • Click on the “Edit” button next to “Page Layout.”
  • Choose the “New” layout and click “Next.”
  • Follow the on-screen instructions to customize your page layout.
  • Click “Publish” to save your changes.

Once you’ve switched to the new page experience, you can take advantage of the new features and functionality, such as improved navigation, updated design, and more prominent call-to-action buttons.

Final Thoughts Switching to the Facebook new page experience is easy and can help improve your page’s overall look and feel. With the refreshed layout and new features, you can better engage with your audience and showcase your brand’s personality. If you’re unsure about switching, you can always preview the new page experience before making the change.

Step 2

If your page doesn’t show new page experience button then don’t worry I will give you an authentic method to do, Just follow the following steps :

Login to your Facebook account

Go to your page

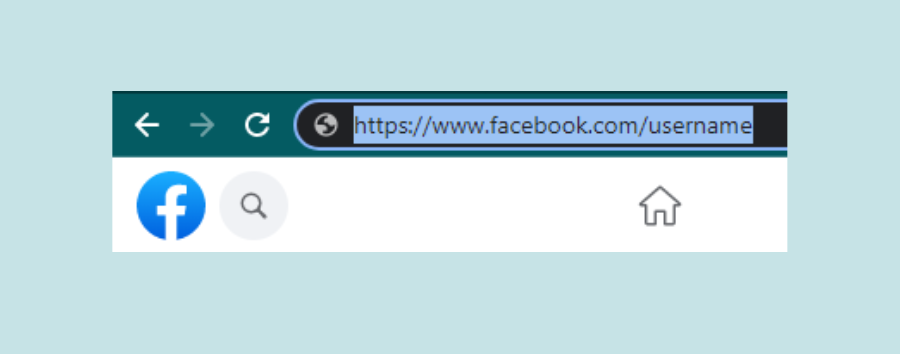
Click on the URL of your page and copy it. ( am just showing this for your learning )

Click on help and support at the top right corner of your profile

Again click on the Help option and you will get a search option

Then type ” Convert classic page into profile page”

Click the first option that Facebook recommends and read carefully and click at the bottom left help box.

Type the following text professionally:

Hello Facebook team!

My page link: https://www.facebook.com/username (Be sure that you are coping your real page link)

is in classic mode. I want to experience new features of Facebook’s new page experience so kindly update my page

Regards

(Be sure that you are coping your real page link) then submit your request.

In 5 to 6 days Facebook will update your page and you will get a notification about the new experience.

Benefits of New Page Experience

Improved user interface: The new page experience has a cleaner and more modern interface, which makes it easier for users to navigate and engage with content.

Customizable templates: The new page experience offers a range of customizable templates that allow businesses to create a unique and professional-looking page that matches their brand.

Updated navigation: The updated navigation in the new page experience makes it easier for users to find the information they’re looking for, including contact details, hours of operation, and more.

Professional Dashboard

As your page has its own identity because of its profile then you also have a Dashboard option that shows all of the impressions and helps to monetize your page. You can also set your target goals.

Reel

After Reel update, this is the major option to grow your page and get followers and it is only reachable to new profiles. You get more impressions more clicks and earn money.

Insight

Better insights: The new page experience includes an updated Insights dashboard that provides more detailed information about page performance, including data on page views, engagement, and more.

Buttons

More prominent call-to-action (CTA) buttons: The new page experience allows businesses to place more prominent CTA buttons on their pages, which can help drive conversions and engagement.

Profile switching

Improved mobile experience: The new page experience is designed to be mobile-friendly, which is critical given that more than half of Facebook’s users access the platform via mobile devices. Also engaging a ghostwriter for academic work, like , can provide businesses the assistance needed to create compelling content that leverages the platform’s new capabilities. Overall, switching to Facebook’s new one can help businesses improve their online presence, increase engagement with their audience, and ultimately drive more sales and revenue.

About

In the About section, you have more options to display links and generate leads.

Differences

let’s look at the differences between the two versions of the Facebook page.

Classic Facebook Page

The classic Facebook page is the one that has been around for a while. It has a cluttered look and can be overwhelming to navigate for new users. It has a menu on the left-hand side that contains options for different sections of the page. The posts, photos, and videos are in the middle of the page, while the right-hand side contains information about the page owner and recommended pages.

New Page Experience

On the other hand, the new page experience has a cleaner and more organized look. The menu is on the top of the page and has a drop-down menu that provides access to different sections of the page. The posts, photos, and videos are on the left-hand side, while the right-hand side contains information about the page owner and recommended pages.

Case in which you are not able to switch pages like a profile

If you are just managing any page and not admin of that page then this switching profile option will not be able to you.

Please let me know if you find this Article helpful, Follow our Newsletter and Subscribe to our blog Msyeditor for amazing content

META LATEST UPDATES ( 2024 )

There are some major changes that are shown to us in our Facebook profile or any page dashboard after the company shifted to “META” are as follows:

Main Profile:

Meta has allowed users and content creators to monetize their profile and upload Reels and Videos to get reach and earn money. Meta also allocated a dedicated Dashboard to check their monetization criteria to meet, before this only Business page can go for monetization.

Page:

When you work some while on your page, Meta gives you a messenger option that is only for specific page and is easy to use and check notifications in messenger. Partnering with an Amazon PPC agency like can similarly streamline your advertising efforts on Amazon. They act as a helper in managing your Amazon ads, ensuring clarity and efficiency in your campaigns. Before this integration, you would have to check messages in your Business account which creates confusion and mess around.